Wednesday, June 29, 2011

Fun for the Fourth

For today's installment of
Fun for the Fourth,
 I thought I would share some festive pillows.


The pillow on the left was made with a tea-dyed flag print and some navy fabric.
The center pillow was made using heavier muslin and some stamps and paint.
The pillow on the right I purchased at Target. {and it goes with everything}

What do you do to get ready for the 4th of July?

Linking up to A Little Tipsy DIY under $5

Tuesday, June 28, 2011

Fun for the Fourth

Today I'm going to share some of my favorite
4th of July
ideas from pintrest.

The Creative Imperative: American Flag Wreath, Sort OfPatriotic Pedicure | 4th of July Parade Wear | FamilyFunStar Medallion - Introduction - MarthaStewart.comForth of July Recipes | TidyMomStars and Stripes Clip-Art Paper Cones - Martha Stewart Crafts4th Of July Dessert | Bakers RoyaleSearch Results nautical : Party PerfectFourth of July Chocolate CakePink and Green Mama: Fourth of July Fun: Sifted Flour Lawn Stars
Scroll over photos for credits.
Most of these ideas require only red, white or blue paper, ribbon, or food.  Easy peasy.
Oh, and those lawn stars?  Made with a homemade stencil and flour!  So fun!

Monday, June 27, 2011

Fun for the Fourth!

This week, I will be sharing some fun and easy ideas for the
 Fourth of July!
Last year, I saw these somewhere online and wanted to try them.  They were pretty easy and tasted better than they looked like they would.


You will need:

marshmallows
coconut
cashews
white chocolate chips
oreos
chocolate tube icing or melted chocolate chips

Coat the marshmallows in melted white chocolate, then stick an oreo on one end.  Coat the rest of the marshmallow in coconut, add one cashew for the beak and draw the eyes and eyebrows with tube icing or melted milk or semi-sweet or dark chocolate chips.  Refrigerate for about 30 minutes till chocolate sets.

Sunday, June 26, 2011

Moments that Matter Most

 
Be sure to take time to appreciate the moments that matter most!
Have a wonderful day!

Friday, June 24, 2011

{Sweet Treat}

For all of you out there who are looking for a great summer snack, you have to try this one!


To make these yummy frozen banana treats, slice bananas in half, and skewer on a stick. 
{I used corn skewers}

Then, dip in melted chocolate.
An easy and delicious recipe for dipping is:

1 cup Semisweet Chocolate Chips
1/4 cup butter, cubed
3 Tablespoons Evaporated Milk

Combine and heat till mixture is smooth.

Next, sprinkle {or roll} your chocolate-coated banana with sprinkles, crushed oreos or candybars or whatever else sounds good.  You could also get extra creative and coat the banana in peanut butter before dipping it in chocolate, etc.

After your bananas are assembled to your liking, place in the freezer.  In the name of science, we tested several of these snacks during various stages of freezing, and concluded that the bananas were nice and cold  after about 30 minutes but weren't frozen solid for several hours...and that even after a few days in the freezer, the frozen banana snacks maintained their deliciousness.

If you have other variations of  this snack, please share!   
We will be experimenting all summer long!

P.S. Come back and visit next week, for some awesome ideas for the 4th of July!

Thursday, June 23, 2011

July Visiting Teaching Message

This month's message is a great reminder visit the temple. 
There is no other place on earth that can compare with the beautiful spirit that is there.  Let us all resolve to make temple service a priority in our lives.


For the message this month, find some cute heavier paper {like cardstock} and cut some strips,
one 8"x4"
one7"x4" and
one 6"x4"
stack them and sew or staple them together.

next, print out this file
{which includes the entire message, scriptures and history, as well as a yummy recipe}
onto heavier paper and trim down to 3 1/4ish" x 7 1/4".

Insert into pockets and embellish.

Happy July Visiting Teaching!

Those of you having trouble printing, try going to "File" under where it says Google docs in the upper left side, then click on "Print PDF"  it should take you to the PDF version where you can print it.
Let me know if you have any more trouble.
Kathy

For those of you who are still having trouble: send me your e-mail address and I will try to e-mail it to you directly...sometimes that works.

Wednesday, June 22, 2011

Latest Thrifty Finds

You know I love a good thrift trip and recently had a great one!

I found this neat silver-colored {tin?, silver plate?} tray,


and about 55 of these cute Christmas dishes.


You know that I'm a sucker for nutcrackers, and on this trip I found 4!


I also found a wood lamp {that I will probably paint} a great lampshade, {that I will cover in ruffles or burlap}  a wood bowl, a book with quilt patterns, a little white candle stand {for a cakeplate} and some Christmas lights {for a project I'm working on}


I also love white-on-white embroidery and think this pillowcase is beautiful!


Yay for thrifting!

P.S.  Recently, I found out that my blog is not letting some of you leave comments...I apologize!  I would love to know how widespread this problem is, and if anyone knows how to fix it.  If you cannot leave a comment, please send me an email at tandkdye@hotmail.com.
Thanks!

Tuesday, June 21, 2011

The Story of Two Tables...

About ten years ago, I needed a table for crafts/scrapbooking, etc.  Space was limited in our two bedroom apartment, but I needed a place to work.  I wanted the table to be tall, so that I could leave my stuff out and the kids couldn't get to it.  So, naturally, I headed to the lumber store and purchased some wood.  For some reason {that I can no longer remember} I bought enough wood to make 2 tables, and slapped them together when I got home with a few nails and screws.  The are very basic, and pretty crappily made, and they wobble sometimes, but have managed to stay in one piece.


Fast forward 10 years, I still use the tables all of the time, only not for scrapbooking and crafts, but for serving food on the deck and out by our firepit for hotdog roasts.  A few weeks ago, my deck table was serving as a yard sale display table when someone offered to buy it.  I was in the clean out/yard sale zone and promptly sold it.  As it was being loaded into their car, I was a little stunned that I had actually sold it, but decided that it was okay, because I had the other one that I could paint and use on the deck.  So that is what I did.  And since I have a thing with turquoise lately, that's the color I painted it.


Here's how it turned out:


It only took one can of spray paint, and after I painted it, I stained it with a gel stain and then, since it will be staying outside, rubbed a wood wax on it.

Happy Tuesday Everyone!

Monday, June 20, 2011

Water Birthday Party

 My son wanted a Water Party for his 7th birthday party, so we gathered up the Slip-n-Slide, some water balloons and half the neighborhood and prayed for a sunny day to play in the water.

The invitations were water noodles {cut in half} with the info tied to the end.


Next I gathered everything we would need at the party:
A {labeled} water bottle for each child


 a water squirter from the dollar store,


{I decided to label them, too}


 sharks-in-the-water cupcakes,


shark jello snacks,


goldfish crackers to eat, and real goldfish to look at,


 and blew up balloons for decoration and filled water balloons for fun.


At the party, we played on the Slip-n-Slide,


had water balloon relays


launched water balloons with the launcher,


opened presents {!}


blew out the candles,


and warmed up in the hot tub when we were done playing.


We sent each guest home with their water bottle, water squirter and a thank you for coming!


Happy 7th to my Jefferson!

Monday, June 13, 2011

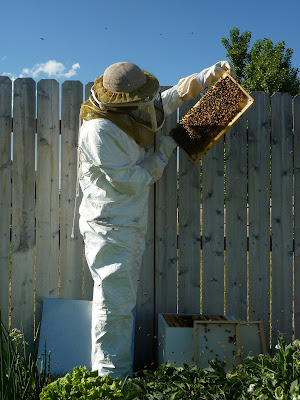
Bee Update

I just wanted to let  you all know that the bees are still alive and...well, buzzing.

{...for those of you who are wondering, yes, that IS a hospital jumper that my husband is wearing.  He first wore it in the operating room when my ten-year-old daughter was born.  Of course we HAD to save it because it would be super useful for things like covering your suit if your tire ever goes flat on your way to work...he has actually gotten a lot of use out of it, and now, it is his beekeeping/suit cover for tire changing suit...}

Last year our bees were mostly dead by now, so we already feel a little more successful than last year.


They seem to be doing everything bees are supposed to do...


gathering nectar, building honeycomb thingies, laying eggs...


...I think they are going to bee alright!

{heh, heh, sorry, I couldn't help myself!}

Saturday, June 11, 2011

Family Subway Art {Printable}

My awesome sister Karin created this fun
Family Subway Art
 for my mom and was kind enough to let me share it with you.
You can download this file by clicking here.
Thanks, Karin!

Thursday, June 9, 2011

Look What I Found!

So, I was at Alphagraphics the other day, and waiting in line.  Being the nosy curious person that I am, I was looking around and saw someone else's copies on the counter.  I gasped.
Twisted Sugar Twine bio picture
They were order forms for Twisted Sugar Twine.
I love all of the bright colors and can think of about a million things to do with them.

I can't wait to order some! {unfortunately, their site is down so I will have to wait...}

Anywho, to finish my story, the girl that they belonged to came up right as I was leafing through them, so THAT was a little embarrassing, but I got talking to her and she was really nice, and didn't seem to mind my apparent lack of manners at all.

Have a super day!

P.S.  This isn't a sponsored post, I just think this stuff is really cool.

Wednesday, June 8, 2011

A Great Project for When You Have Absolutely Nothing Else to Do


I saw a tutorial for these cute hair clips over on Jones Design Company the other day.
Seeing as how I have a daughter with crazy hair in her face, I thought I would use some of my ribbon scraps and pretty up some hair clips for her.

Start with some hair clips, thin ribbon, scissors and fabric glue.


Cut the ribbon into 7 inch lengths and glue the back.


I held the clip open backside-up and started the ribbon on the inside, wrapped it around the bottom, then wrapped the part of the clip where you squeeze, the top of the clip, and back inside to the middle.  Whew!  {Got that?}


Ta Da!


She likes the pink ones the best.

Note: By the end of the day, she had pulled it out and {rrrrrr!} sucked a lot of the glue off.  Luckily, the glue was non-toxic...

For a more detailed hair clip tutorial {and lots more awesome tutorials}, visit

Have a great day!
Related Posts Plugin for WordPress, Blogger...